Hand-Cut Log Tenons: Simple Layout, Sawing & Cleanup
How to cut log tenons by hand?
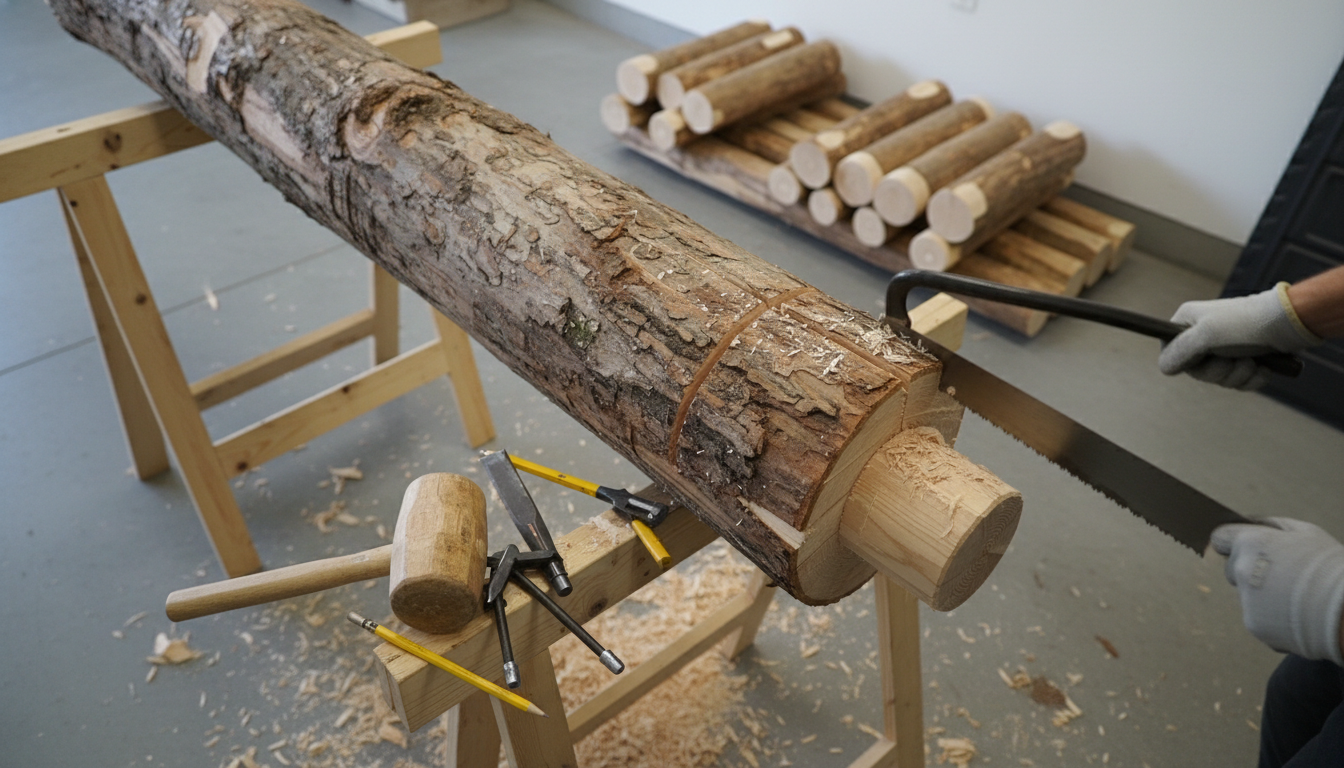
Cutting log tenons by hand is completely doable with basic layout tools, a sharp saw, and patient cleanup. The goal is a round, consistent tenon that matches your mortise or hardware, with a square shoulder that seats tight.
1) Choose the tenon size and mark a clean shoulder line
Decide the tenon diameter first (commonly 1/2 inch for smaller rustic projects, larger for heavier joinery). Measure the depth you want the tenon to insert, then wrap a strip of paper around the log to create a straight, level reference line. Trace that line all the way around—this is your shoulder line, and it needs to be crisp.
2) Lay out the diameter around the end
On the end grain, find the center point and lightly sketch a circle the size of your tenon. If you don’t have a compass, trace around a washer or socket of the correct diameter. Extend several guide lines from that circle down the sides toward the shoulder line to help you keep the shape even.
3) Remove bulk waste with controlled cuts
Make a series of shallow relief kerfs down to the shoulder line, spaced every 1/4–3/8 inch around the log end. Use a sharp hatchet or sturdy chisel to split off the “fingers” between kerfs, working gradually so you don’t tear below the shoulder. Stop often and rotate the log to keep removal even.
4) Refine the cylinder and square the shoulder
Switch to a drawknife, spokeshave, rasp, or coarse file to bring the tenon to a smooth, round cylinder. Keep checking the fit by test-inserting into the mortise or a sizing gauge. Clean up the shoulder with a chisel so it’s flat and perpendicular to the tenon—this is what prevents wobble.
5) Dry-fit, then tune for a snug seat
A good fit should push in firmly without crushing fibers. If it binds, mark shiny rub spots and shave only those areas. For more context on sizing and hardware options, see the guide here: log tenon cutter kit guide (4/6/8-piece sets, 1/2-inch and more).
FAQ
What tools do I need to make a log mortise to match a hand-cut tenon?
A brace-and-bit or drill with a spade/auger bit works well for roughing the hole, then a sharp chisel refines the walls. Test-fit often and focus on a flat, clean shoulder seat rather than a perfectly polished mortise.


Leave a comment